top of page
  • rosalielochner
  • Nov 21, 2024
  • 4 min read

I don't play favorites. I Love all Turkey Chili recipes. If, however, I absolutely had to pick a favorite Turkey Chili-baby, it would be this one. I've been making this Cozy Turkey Chili for about 20 years. It's literally the recipe that made my boyfriend (now husband), who never wanted to eat leftovers ever, eat leftover chili for breakfast.


This recipe is the perfect way to use leftover Thanksgiving turkey OR can be made with turkey or chicken cooked just for this recipe. If your poultry is already cooked, then it comes together in a snap, If you need to cook your meat, you don't need to add extra time just an extra step.

ree

Note about Toppings:

We are a toppings family. We love them ALL. We love diced jalapeño, bacon crumbles, shredded sharp white cheddar cheese, green onions, cilantro and lime. My husband would argue that bacon is an absolutely must. I would say that lime and white cheddar are what tie this dish together, but all the toppings are lovely.


Note about "Bottomings":

The opposite of Toppings is Bottomings, right? We love to have orzo underneath this chili, but any small pasta is fantastic. For a hearty crunch and some extra greens, we usually add a layer of fresh spinach or crunchy kale/cabbage mix. It's not a "healthy sacrifice." The added crunch is divine and it's just as comforting as the plain pasta version.


Note about Spice Level:

We used to make this chili with a medium spice level: we'd add a small minced jalapeño and sauté it with the yellow pepper and then add 2 cans of mild green chilis. We now have 3 kids and we keep things fairly mild: we use 1 can of mild chilis and skip the minced jalapeño. This milder version still has a tiny bit of spice to it, but it's easy tamed with the milk and cheddar cheese. (Adults can then add red pepper flakes and/or jalapeño slices to spice up individual bowls).


Note about Cooking Poultry for this Recipe:

If you're cooking turkey or chicken for this recipe, first bring a large pot of lightly salted water to boil. Once it comes to a boil, add your chicken or turkey (I use white meat or a mixture of white and dark meat) and cook until the poultry reaches 165 degrees. Remove poultry from boiling water and keep low heat under your boiling water so it will be ready to cook your pasta. The turkey/chicken water will add AMAZING richness to the pasta you're going to cook.


ree

Quick and Cozy White Turkey Chili

Recipe serves 5-6 as a main and is easily doubled. We always double it and freeze some. It reheats very well.

Total Time: 1 hour


Ingredients

4-5 slices of bacon (optional but encouraged)

2 tablespoons bacon grease or avocado oil

1 large yellow pepper chopped

1 medium yellow onion finely chopped

1 jalapeño seeds removed and diced OPTIONAL

2 teaspoons cumin

1 teaspoon oregano

2 medium cloves of garlic

1 teaspoon salt

2 cups whole or 2% milk (plus possibly 1/2 cup extra)

1 can (roughly 15oz) creamed style corn

1 can (roughly 16 ounces) navy beans

1 or 2 4oz cans mild chopped green chilis

2-3 cups shredded turkey (about 12 ounces cooked turkey or about 1lbs pound raw).

8 ounces orzo or other small pasta

Salt and pepper to taste


Toppings for serving

4-5 slices of bacon, crumbled

4 tablespoons chopped cilantro

1 green onions chopped

1 cup shredded sharp white cheddar cheese

1 lime cut into wedges


STEP ONE:

Set up a large (6-ish quart) pot of salted water over high heat to come to a boil for your pasta.


STEP TWO

Using a 6-8 quart dutch oven or thick bottomed pot that's wide enough to fry some bacon, fry your 4-5 pieces of bacon on medium-low heat until crispy (about 7 minutes). Remove bacon from heat, and set aside to cool. Pour off all but 2 tablespoons of bacon fat.


STEP THREE

Return pot to stovetop over low heat. Add chopped onion, chopped yellow pepper, and diced jalapeño. Sauté on until the peppers soften and the onions start to become translucent (about 10-12 minutes). Then add minced garlic, 2 teaspoons cumin, and 1 teaspoon oregano. Stirring continuously, allow to cook for about 1 minute. Once spices have bloomed and garlic has started to soften, add 2 cups of milk, 4 oz can of diced green chilis, can of creamed style corn, can of drained and rinsed navy beans, 1 teaspoon salt, and a few grinds of pepper.


STEP FOUR

Increase heat to medium and allow milk/veggies/bean ingredients to come to a simmer then lower stove temperature to medium-low and simmer for 15 minutes. While your chili simmers you can shred your meat. If using a kitchen stand mixer: add cooked turkey to bowl and use paddle attachment on low speed shred it. Further instructions for using the stand mixer can be found here. If you don't have a stand mixer: Use two forks (and some patience) to shred your meat into bite sized pieces.


STEP FIVE

Add your shredded turkey to your chili. If the chili seems too thick, and 1/4-1/2 cups more milk. Allow and allow chili to simmer for another 15 minutes.


STEP SIX

While the chili simmers prep any toppings you want to use, and cook your orzo according to package. Drain pasta. Taste your chili and adjust seasoning as needed. Serve hot with a layer of pasta and a good ladleful of chili and your favorite "bottomings" and toppings.


  • rosalielochner
  • Nov 13, 2024
  • 5 min read

Updated: Oct 9

Do you need to practice self-care through baking? Or compete with your sibling's dessert this Thanksgiving? Either way this tart is the right answer. It's a gorgeous showstopper. It is more delicate than an apple pie, and is an ethereal way to end a meal. This is the perfect dessert for a smaller Thanksgiving where you want to win the dessert category. It tastes beautifully like fall apples with a background of sweet, slightly salty, buttery crust. It is perfection served warm or at room temperature and magical with a dollop of sweet whipped cream.


Hi friends, neighbors, and those who accidentally clicked on this website :). I've been gone for a while, but I'm ready to get back to it. I've been playing in my new kitchen for about 2 months, and while I've now got a few recipes that I'm excited to share, I decided to start with this apple tart because--duh--it's perfect for the season. There are so many versions of this tart out there on the internet but I believe that mine, with its simplicity and my secret trick below, it absolutely the best.


NOTES:

My Secret Trick: Other recipes will tell you to soak your apples in warm water to make them more pliant, but I haven't found it to make a difference (and also wet apples will ruin your crust). My secret trick to get perfect apple "petals"is to let your apple slices macerate for a few minutes in powdered sugar. this will make them bend with minimal breaking.


Apple Variety: I've made this tart with pretty much every apple out there and it's always good. That said, this tart works best with a crisp apples like Evercrisp, Honeycrisps, and Cortlands. And while it's delicious with green apples, the green skin just doesn't give you the same WOW factor as the red.


Variations: There are so many versions of this tart, and I've tested them all. Most versions use some kind of almond paste, but this drowns out the apple flavor leaving you with something like an almond croissant plus apples. I believe that my version is a joy in its simplicity.


What Pan To Use: A 9"tart pan with a removable bottom is great for this as it will allow you to show off the beautiful crust. That said, a 9"pie pan works just fine and still makes for an impressive show.


Salted Apple Tart

Adapted from Yossy Arefi's Rose Apple Tart, New York Times

Time: 2-3 hours including chilling dough and baking. Serves 8

Requires 9 inch tart pan with removable bottom or 9" pie pan


Ingredients

TART CRUST
  • 1 1/4 cups all-purpose flour

  • 1/2 cup confectioner's sugar

  • 3/4 teaspoon diamond kosher salt (or scant 1/2 teaspoon table salt)

  • 9 tablespoons cold, unsalted butter cut into 1cm cubes (European is amazing but American works fine)

  • 1 egg yolk straight from the fridge

  • 1 teaspoon vanilla

  • 1 tablespoon ice water


FILLING
  • 3-4 medium crispy red apples (see note above)

  • 1/4 cup powdered sugar

  • 2 tablespoons almond meal

  • 1/2 teaspoon cinnamon

  • 1/8 teaspoon kosher salt

  • 2 tablespoons unsalted butter


GLAZE

  • 1 tablespoon apricot preserve (preferably smooth but I've used chunky and just worked around the chunks)

  • 1 tablespoons water


FINISH

  • Pinch of flaked sea salt (optional)


Instructions


STEP ONE

Butter/grease tart pan or pie pan and set aside.


STEP TWO

In the bowl of a food processor (or a medium mixing bowl) combine 1 and 1/4 cups flour, 1/2 cup confectioner's sugar and 3/4 teaspoon kosher salt. Pulse processor or stir with a spoon to combine. Add 9 tablespoons of cold butter cubed into 1cm pieces and either cut butter in with a pastry blender or pulse food processor until butter is the size of lentils. Add egg yolk and 1 teaspoon vanilla, and cut/pulse until just incorporated. You'll see some yellower specks from the egg yolk, that's just fine. Add 1 tablespoon of ice water and cut/pulse until dough can be brought together into clumps.


STEP THREE

Dump roughly 3/4 of the dough into the tart pan. Spread the dough across the pan and up the sides. You can use a piece of wax paper or plastic wrap to quickly spread the dough up the sides of the pan. Use as much of the reserved dough as necessary to get the dough all the way up the sides. If using a pie pan, you'll probably use almost all of the dough. If using a tart pan, you'll have about a 1/4-1/2 cup left over. Put the shaped tart into the freezer for 30 minutes or wrap in plastic wrap and freeze to use at a future date.

ree

STEP FOUR

After chilling tart crust for 30 minutes (or a few days), preheat oven to 375 degrees or (350 degrees Convection). If using a tart pan, put your crust on a sheet pan. This prevents dropping the outside ring of the tart pan when you try and get it out of the oven. Bake for 15-20 minutes until it begins to take on a golden color and puffs up a bit. Remove from the oven and set aside to cool for 5-10 minutes before you begin filling your tart with apple slices.


STEP FIVE

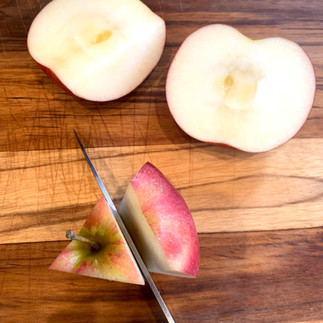
While your pie curst cooks cut your apples: Using the photos below as a guide, cut the apples into 3 sections, leaving behind the core. Then, using a sharp knife or a mandolin, cut the apples into roughly 1/16-1/32 of an inch slices (I've only ever used a knife). Put apples into a medium bowl and mix apple slices with 1/4 cup powdered sugar. Set aside. Your apples are going to melt that powdered sugar and start to soften just a tiny bit. This means that it will be easier to shap your apples as you get to the center of your tart! You're welcome :)


STEP SIX

Preheat your oven to 375 degrees (or 350 Convection). In a small bowl combine 2 tablespoons almond flour with 1/2 teaspoon cinnamon and 1/8 teaspoon kosher salt. Sprinkle the cinnamon-almond mixture on the crust bottom. Then begin to line up your apples around the outside of the tart. Each apple should overlap the previous by about 1/2-2/3. If you've cut any extra thin slices, save those for the center peices since those require the most flexibility.


STEP SEVEN

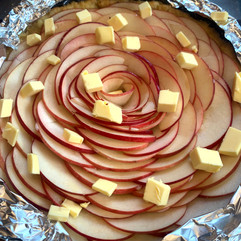
Cover the edges of your crust with a pie shield or some torn up strips of tinfoil (see photo above). The tinfoil can be loose, it will prevent the edges of the crust from browning too quickly. Cut up 2 tablespoons of butter into roughly 1cm cubes and sprinkle them over your apple slices. If you're using a tart pan, remember that it needs to be on a baking sheet so the bottom doesn't fall off when you put it in or take it out of the oven.


STEP EIGHT

Bake your tart for 20 minutes and then check to see whether the edges are browning. If the crust is already coming along, then leave it covered. Otherwise, remove the tinfoil and cook for another 5-15 minutes (25-25 minutes total). The tart is done when the apple slices start to take on color and the visible tart crust has a lovely bronzed color. Remove tart from oven and set aside while you make the preserve glaze.


STEP NINE

Mix together about 1 tablespoon of apricot preserve or jam and 1 tablespoon of water. I don't bother measuring these ingredients). Using a microwave heat the preserve and water in short 10 second bursts until very warm and viscus. This takes me 2x10 second bursts. Mix the water and jam together and then use a pastry brush, basting brush, or allow to cool slightly and use your finger tips to spread over the top of the warm tart, and it's done!


Serve warm or at room temperature with a pinch of flaked sea salt over the top! Serve on its own, with whipped cream or with ice cream. Leftover tart, if there is any, can be stored in the fridge for a few days.


  • rosalielochner
  • Aug 5, 2024
  • 2 min read

Hi, I'm still here! Here-ish. I hope you're indulging in the glory of slow summer days and crunchy fresh produce.

ree

As I finish sorting through the dregs of my basement, and talk to moving companies, school admins, and karate dojos in another state, I'm trying to channel grace about this whole thing. I have wonderful friends in Michigan. I love the ease and independence that my kids have here. If, however, I'm being honest, I've got an itch to be in the hills, to have new adventures, and to be closer to my sisters.


With the exception of some perfect peach and blueberry pies I haven't been baking much and cooking even less. But last night I went all out. I cooked from Marcella Hazan's Essentials of Classic Italian Cooking, and Samin Nosrat's Salt, Fat, Acid, Heat and it was so good for my soul. We feasted on fried Zucchni blossoms, fried zucchini, tomato cream sauce, and bittersweet chocolate pudding. After dinner everyone was blissed out with perfectly full bellies and we played boardgames until bedtime.


We're going to hit the road in about 10 days. But of course as I start to pack up my kitchen, I'm finally excited to cook again. We've found our modernist dream house and I can now imagine what it's going to feel like to cook in our new home (When we're finally able to move in). I'm starting to have ideas about the recipes I'd like to work on and I've even begun testing a few. Send me some good energy as we load everyone up into the minivan and do some traveling while we wait to settle into our new house.


bottom of page