top of page
  • rosalielochner
  • May 28, 2024
  • 2 min read

When the weather gets warm and I cannot bring myself roast vegetables because of how hot our oven makes our house, this is our answer to kid and adult friendly veggies. This is broccoli two (easy) ways. It's magic because you can pull out some "plain" broccoli to keep your picky eaters happy, and then proceed to add garlic and lemon for the slightly more adventurous at the table.


I don't even know if this counts as a recipe, but it's my best way of making sure everyone eats tons of broccili. An extra bonus is that cooking it this way means that your broccoli will retain its vibrant color and not turn dull even if it has to rest while you cook the rest of your meal.

ree

An (Un)important Note about CHOPPIN' BROCCOLI: In our house you must sing Dana Carvey's SNL song "Choppin' Broccoli". It's the only authentic way to make this dish.


A Useful Note about Chopping Broccoli: My kids love the florets, but if you cut any dried parts off the stems, and then cut off the outer 1/8 of an inch or the stalks, (some people use a vegetable peeler, but I prefer to just use a knife) the inner part of the stalk is sweet and delicious too.


Broccoli for Picky AND Adventurous Eaters

Time: 10 minutes. Serves 6


Ingredients

1-1.5 pounds broccoli (or 2 medium sized crowns)

2 tablespoons butter or olive oil

2 cloves garlic, minced or crushed

1/8-1/4 teaspoon sea salt

zest from half a lemon

fresh pepper


STEP ONE

Chop your broccoli florets and your peeled and trimmed stems into pieces that are slightly bigger than bite size. Add 1/2 cup of water and 1/8-1/4 teaspoon of salt to your widest frying pan that has a lid. Add your broccili to the pan, turn on the heat to medium high and cover. Cook for about 3 minutes with the lid on. Then stir and check broccoli to see if it's done. Cook for about 1-3 more minutes until you reach desired level of donness.


STEP TWO

CAREFULLY use the lid of your pan to strain any remaining water out from the broccili pan. Please use oven mitts and watch out for steam! It's important that you hold the lid on tight so you don't lose your broccoli in the sink. (If you really cannot master this technique you can pour the broccoli into a strainer and then return it to the pan). See photo of lid-technique here:

ree

STEP THREE

After straining out water, broccoli should all be on one side of the pan. Return pan to burner with broccoli pushed against the side of the pan. Use a spoon to remove any broccoli that needs to be kept plain and set aside. Then add butter or oil to the side of the pan without broccoli and center flame under this portion of your pan. Once butter to begins to sizzle add minced garlic and allow to cook for a few seconds before folding the broccoli into the butter/oil.

ree

Sprinkle lemon peel on top, and add a few grinds of fresh pepper, taste for seasoning, and stir for about a minute to let things come together. Serve broccoli warm or set aside and serve at room temperature.



  • rosalielochner
  • May 20, 2024
  • 4 min read

Updated: Oct 9

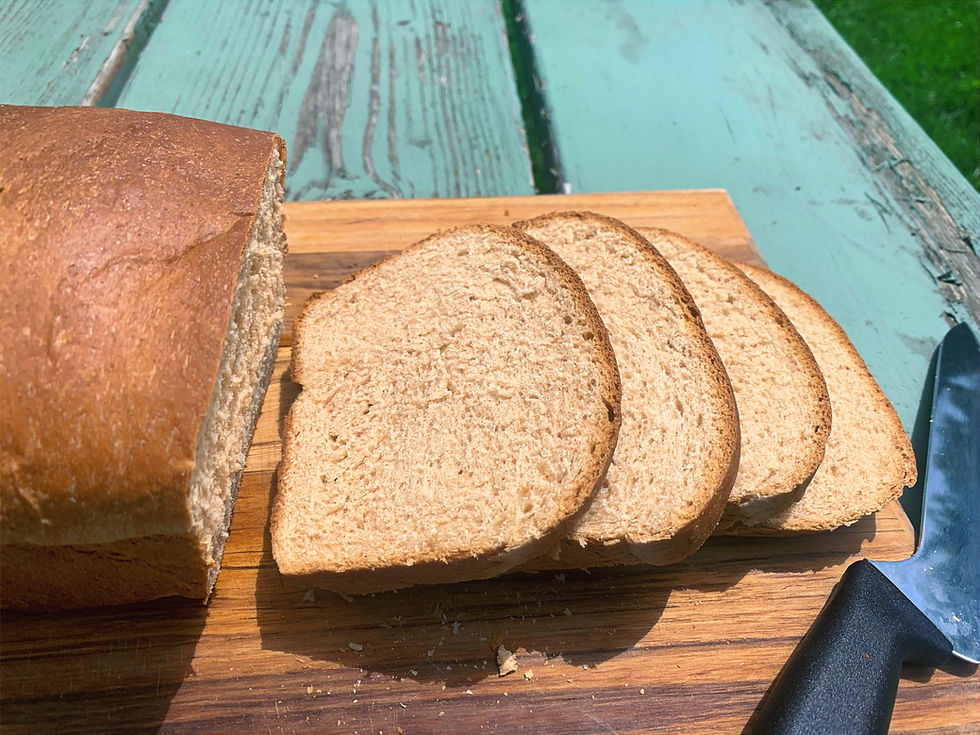
It is glorious to be able to take photos outside in the sunshine! The weather here is perfect Michigan spring and we're just eating it up. My kids love to eat outside and they will merrily cart plates and silverware outside even just for a quick snack. After I was done with this photo shoot, we enjoyed slices of still-warm wheat bread smeared with butter and drizzled with honey. The rest of the bread was saved for school lunches.


This light wheat bread it is the perfect sliced bread. It's pillowy and sweet from the malted milk, slices well, and my kids love it. It requires two very short rises and is done in 2.5-3 hours. The hardest part of making this bread is waiting for it too cool to slice it. Make it the night before you need it and you'll have the best sandwiches the next day.


This recipe is based on Stella Parks, "Homemade Wonder Bread." I've simplified the ingredient list, and changed up the proportions a bit, but kept her techniques. Getting this perfect texture and underlying sweetness requires two elements, neither of which is tricky: adding malted milk powder and making an easy roux. You can find malted milk powder at most grocery stores or buy it online. It keeps for a long time and is a great addition to things like waffles, cookies, pancakes, and brownies. The roux is just some milk and flour cooked on the stove until it has the consistency of mashed potatoes. It takes about 2 minutes of cooking over medium heat to get it to that texture, and that's it! With these two tricks your bread will stay moist and have a sweet lingering taste that kids (and adults) love.

ree

NOTE ABOUT SUGAR: We like this bread with either the full amount of sugar or 1 tablespoon of sugar and 3 tablespoons of honey. It honestly just depends on your personal preference. If using honey, just add 1 tablespoon of sugar when you're activating your yeast and add the honey when you add the coconut oil to the dough.


Wheat Sandwich Bread

Time 2.5-3 hours plus time to cool

Special equipment: 8" bread pan, stand mixer (or very strong arms)

Adapted from Stella Parks "Homemade Wonderbread" in BraveTart: Iconic American Desserts


Ingredients

Milk Roux

1/3 cup or 1.4 ounces bread flour 3/4 cup whole milk


Activating Yeast:

3/4 cup whole milk warmed but not hot (about 110 degrees)

2 teaspoons dry active yeast

1/4 cup sugar


Dough

2 and 1/3 cups or 10 ounces bread flour

1 cup whole wheat flour or 4 ounces (not white wheat or stone ground)

1/3 cup (1.5 ounces) malted milk powder

1 and 1/2 teaspoons Diamond brand kosher salt (half as much table salt)

1/4 cup coconut oil or 1.5 ounces (virgin or refined your bread will not taste coconutty) at room temperature (sold but not hard)


STEP ONE: Make the Roux

Combine milk and flour in a small pot and cook over medium heat stirring constantly with a fork or heat-safe spatula. The milk and flour will quickly go from unmixed, to a glue like consistency to mashed potato consistency. When it's thick like mashed potatoes remove from heat and set aside to cool (about 5-10 minutes).


STEP TWO: Activate the Yeast

Add the sugar and yeast to warm milk (milk should feel warm not hot) and set aside to bloom. Once yeast has bloomed and roux has cooled move on to step 3 (about 5 minutes).


STEP THREE: Make the Dough

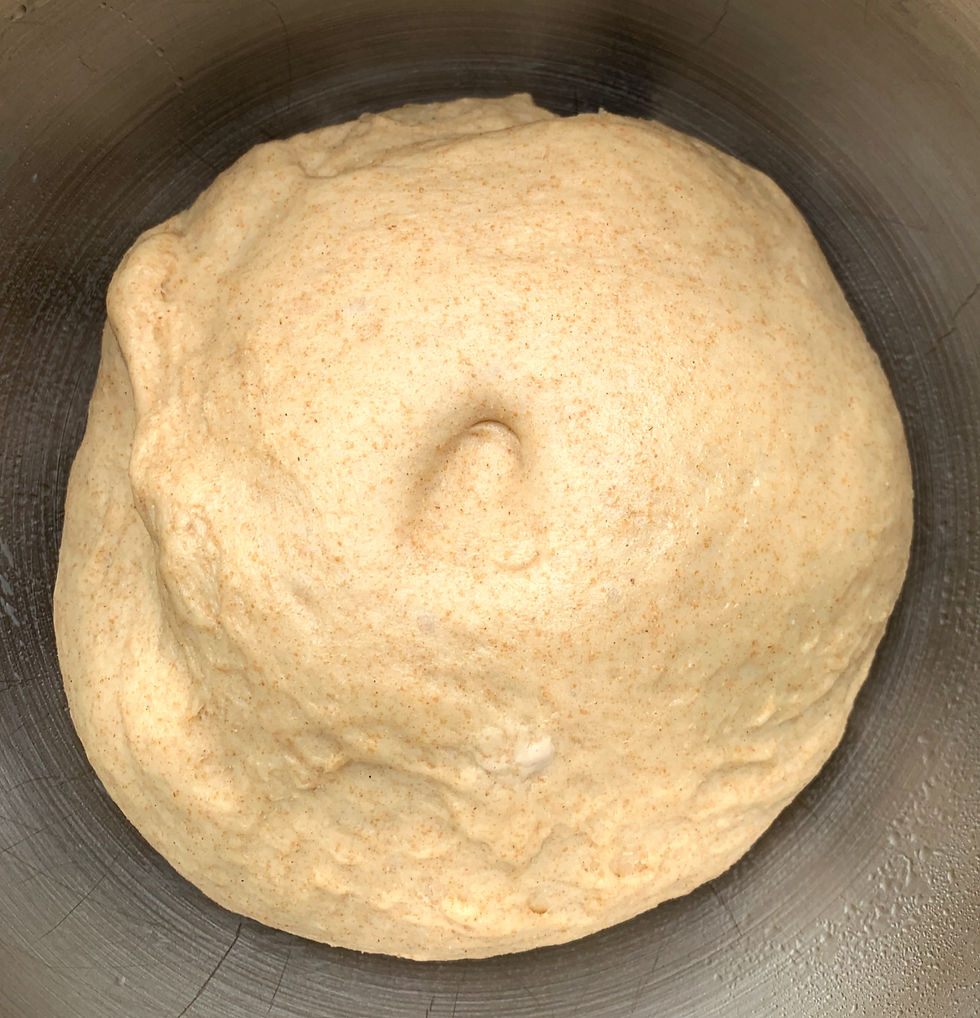
Add both flours, salt, malted milk powder, coconut oil, yeast-milk and sugar mixture, and roux to the bowl of your stand mixer fitted with dough hook attachment. Start on "stir" and combine ingredients. then on 2 to kneed for 12 minutes. Dough should be sticky and not look ragged when you pull pieces apart. Dough should pass the "bubble gum test" of being able to stretch without tearing in half, instead it should look like it's a popped bubble gum. Oil your stand mixer bowl and form dough into a smooth ball and turn once to cover in oil. Set dough in a warm spot for about 30 minutes until dough becomes puffy and feels firm. You should be able to make an impression on your finger. See photo below. In a cool kitchen this could take 45 minutes to an hour.


ree

STEP FOUR: Shape Your Loaf

Preheat oven to 350. Turn dough out of bowl and spread into an 8x8 inch square then fold it in thirds like you're folding a piece of paper to stuff an envelope. Put the folded dough in a oiled 8 inch bread pan and cover with plastic wrap. Allow to rise in a warm draft free place for 30 minutes.


STEP FIVE: Bake Your Bread

Add bread to preheated oven and cook for about 45 minutes until bread is golden brown and reaches 200 degrees. Allow bread to cool in the pan for 5 minutes then gently remove it from the pan to finish cooling before slicing.


  • rosalielochner
  • May 13, 2024
  • 2 min read

I love this mild, smoky and sweet shredded chicken. It's the perfect base for tacos, burritos, enchiladas and so much more. This shredded chicken recipe is soooo easy, turns out perfectly every time, and will please both adults looking for good flavor and spice-adverse kids. The chicken is made ahead in the slow cooker so most of the work is hands-off. Furthermore, this recipe freezes so well that I usually make a double or triple batch and then freeze the extra in ziplock bags. It thaws and reheats really well on the stove top, and just fine in the microwave. We have this recipe on heavy rotation.

ree

Note about Cooking Time: Unlike cooking thick cuts of meat, chicken does not benefit from an elongated cooking time. Feel free to turn the heat up to high, and cook this chicken in 2-3 hours. That said, if you double or triple this recipe, it will take a little longer to cook and will need to be stirred every hour for even cooking.


Note about Shredding Chicken: My friend Elisa changed my life when she told me that I could shred my chicken in a stand mixer. Before that I used to DREAD shredding meat because my hands would cramp. If you have a stand mixer, add your cooked chicken to the bowl and then use your paddle attachment to shred your chicken. It only takes a minute or two. The first time I tried this I swear I heard Handel's "Hallelujah Chorus."


Note about Canned Chipotles in Adobo Sauce: I used to make this recipe with chipotles and their canned adobo sauce, but it was always too spice and had a little bit of a metallic taste. In my sauce, you'll get the heat and flavors of the chipotles but then you're essentially making a quick and mild adobo sauce of your own. Extra canned chipotle peppers will keep for several weeks in a Tupperware in your fridge.


Honey-Pepper Shredded Chicken

  • Prep time 10 minutes, cook time 2-4 hours. Serves 5-6 Doubles well

  • Special Equipment: slow cooker. Stand mixer (recommended) .


Ingredients

1.5 lbs boneless, skinless chicken thighs

1 tablespoon olive oil

3 tablespoons honey

2 tablespoons cider vinegar

1-2 canned chipotles in adobo sauce seeds removed and diced

1 teaspoon sweet or smoked paprika

1 teaspoon onion powder

1 teaspoon garlic powder

1 teaspoon cumin

1 teaspoon diamond kosher salt

1/8 teaspoon cinnamon (optional)

juice of 1/2 a lime


To Finish

small bunch cilantro, cleaned and chopped

1/4 cup red onion diced

lime slices

tortillas


STEP ONE

Set your slow cooker to high and add everything except the chicken. Stir to incorporate, then add chicken thighs and coat them in the sauce. Put the lid on your slow cooker and cook for about 2-2.5 hours on high or 3-4 hours on low. Chicken is done when it reaches 165 degrees.


STEP TWO

Remove chicken from the crockpot and leave the juices behind (do not discard!). Shred your chicken either by hand or in a stand mixer and then return meat to your slow cooker, stirring it back into the juices in your crockpot. Serve as tacos, burritos, enchiladas, or on top of chilaquiles or rice-bowls.


bottom of page